I’ve been having a hell of a time getting my sourdough to rise in a decent amount of time. I am working with 100% wild yeasts, captured from the beautiful Skyway wind or already present in the starter flour. This recipe being my first real attempt at naturally leavened bread, at first I thought this was just the nature of wild yeast versus commercial yeast – they take a bit longer to do their business. But 8-10 hours for a first proof just ain’t gonna work around here, not when there is a second rise before baking and I am not so dedicated as to get up at 2 am to put the bread in the oven.
Along with the time issue I have not been very happy with the structure of the bread itself. It has great crumb, good tang and nice irregular holes. But on the second proof it seems to loose all internal structural integrity and spread out over the pan to resemble a giant bread pancake or pogacha (for those of you familiar with it). The taste is fine, but it is damn hard to make a sandwich with a slice of bread 10 inches long and only 2 inches high. At first I thought this was a water to flour ratio issue. I bumped up the flour in the recipe and gave that a shot with little change. The bread was denser (not necessarily what I was going for) but still slopped all over the place on the second proof. I remedied this somewhat by starting to put the dough in bread pans for the second rise. This give a bit more external structure to the dough so I get a bit of height, but it compromises the crust and that is half the point of sourdough, right?
So I got to thinking that perhaps my long proof time and pancake loaves were connected. Could it be that in the extended proof, the yeast were actually breaking down the glutens so much that structural integrity of the dough was lost? I needed a proof box. The original recipe called for a second proof at 100 degrees with humidity – and in the absence of a bakery’s equipment offered the solution of enclosing the baking pan in a plastic garbage bag, filled with air and closed tightly. They then instruct you to place it somewhere warm in the house between 80-100 degrees. Now I don’t know about you, but my house rarely gets above 70, and that is in the dead of summer. Our old plaster walls do a great job of regulating the temperature so that it resembles a basement more than a home. Even in the winter with the heat going we have the thermostat set to 68 or 69. The assumption seems to be that all home bread bakers live in California or Florida.
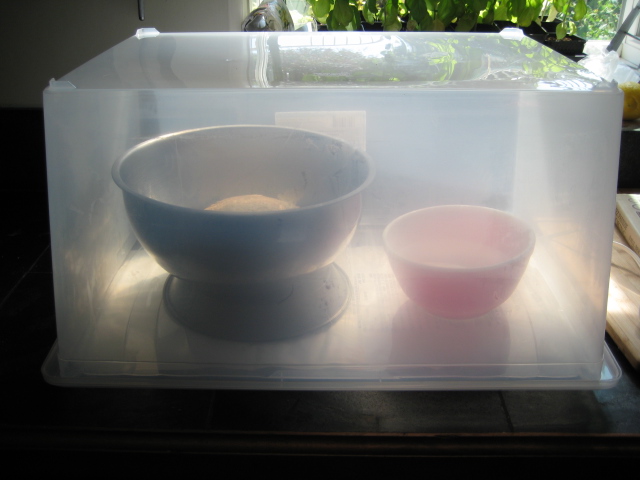
Aside from lacking the space to put it, I am hardly in the financial position to go out and buy a proofing box for my bread experiments. So I started searching on methods for a DIY proofing box. I settled upon a heating pad, a large clear plastic storage container and a bowl of hot water.
And it worked! At least better than before. I placed the heating pad on the counter and put the lid of the box on top. Put the bread bowl and a bowl of boiling water in and covered the whole thing up with the updended container. The first proof still took a long time, but I think that is partly due to the fact that I didn’t realize the heating pad had an automatic off timer after 2 hours. The second proof only took around 1.5 hours – very much improved from previous attempts.
But the dough still slopped, not as bad as before but for the hand formed loaf I still only got a total height of around 2.5 inches. I will continue tweaking, but I don’t think I can reach that 100 degree goal with my little contraption here.


7 responses so far ↓
1 Chris Stovall // Aug 6, 2008 at 5:53 am
Thanks again for finding my site with our urban farm project. It looks like you guys are doing really well. This is our first year, so it’s definately a learning process. Have you seen my Mother-In-Laws blog? http://www.MixedGreensBlog.com.
Thanks,
CDS
2 maya // Aug 9, 2008 at 2:35 pm
Keep at it Chris, the backyard looks beautiful already and just wait til ya taste it. I will check out her site.
3 Ale // Jul 17, 2015 at 7:15 am
Absolutely first rate and coomer-bpttoped, gentlemen!
4 http://autoinsurancetun.top/cheapinsuranceonavehicle.html // Sep 7, 2015 at 1:47 am
That’s way the bestest answer so far!
5 http://autoinsuranceiok.org/texascarinsurancerates.html // Sep 7, 2015 at 2:02 am
You’re the greatest! JMHO
6 http://bettygrlicac21.com/cheapinsurancequote.html // Sep 8, 2015 at 9:12 am
Thought it wouldn’t to give it a shot. I was right.
7 2vineyard // Jan 12, 2022 at 1:10 pm
1correcting
Leave a Comment